How to Make a Restaurant Menu From Scratch in 2026



To make a menu for a restaurant, define your concept and guest, list the dishes your kitchen can repeat at peak, cost and price each one, group them into categories, write short descriptions, choose a format, lay out the page, add allergen notices, proofread, and publish with a plan for updates.
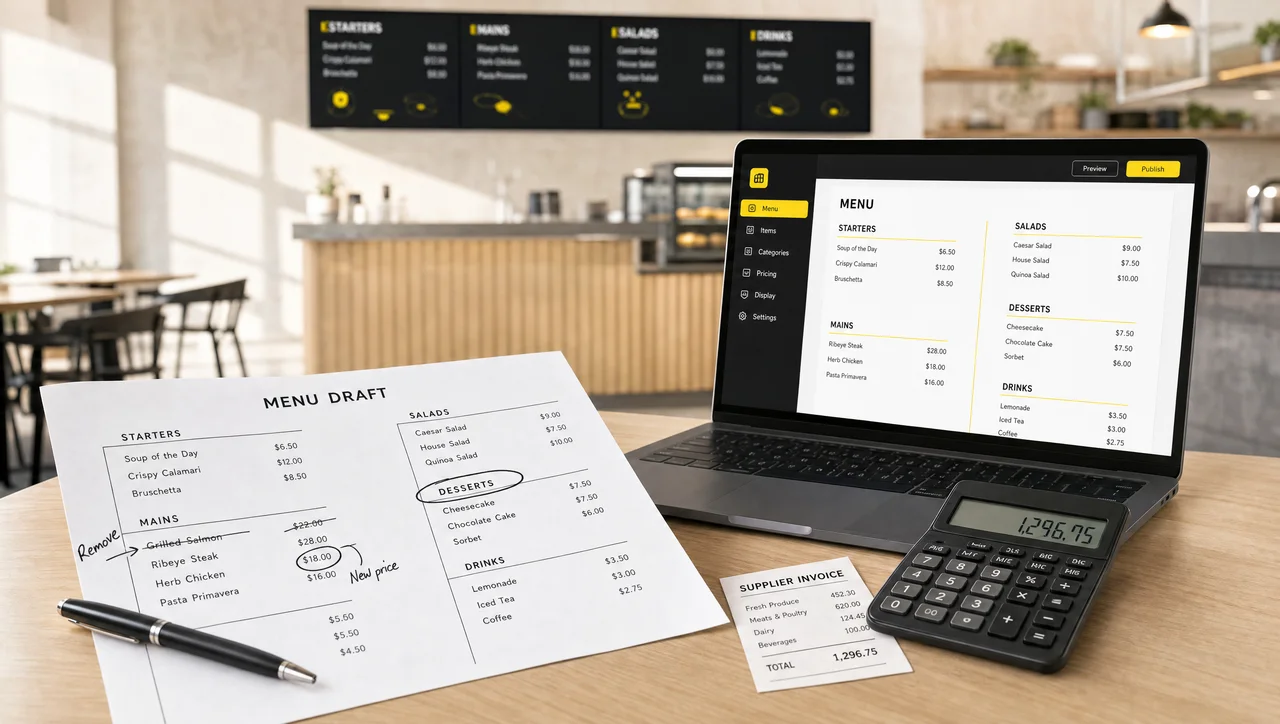
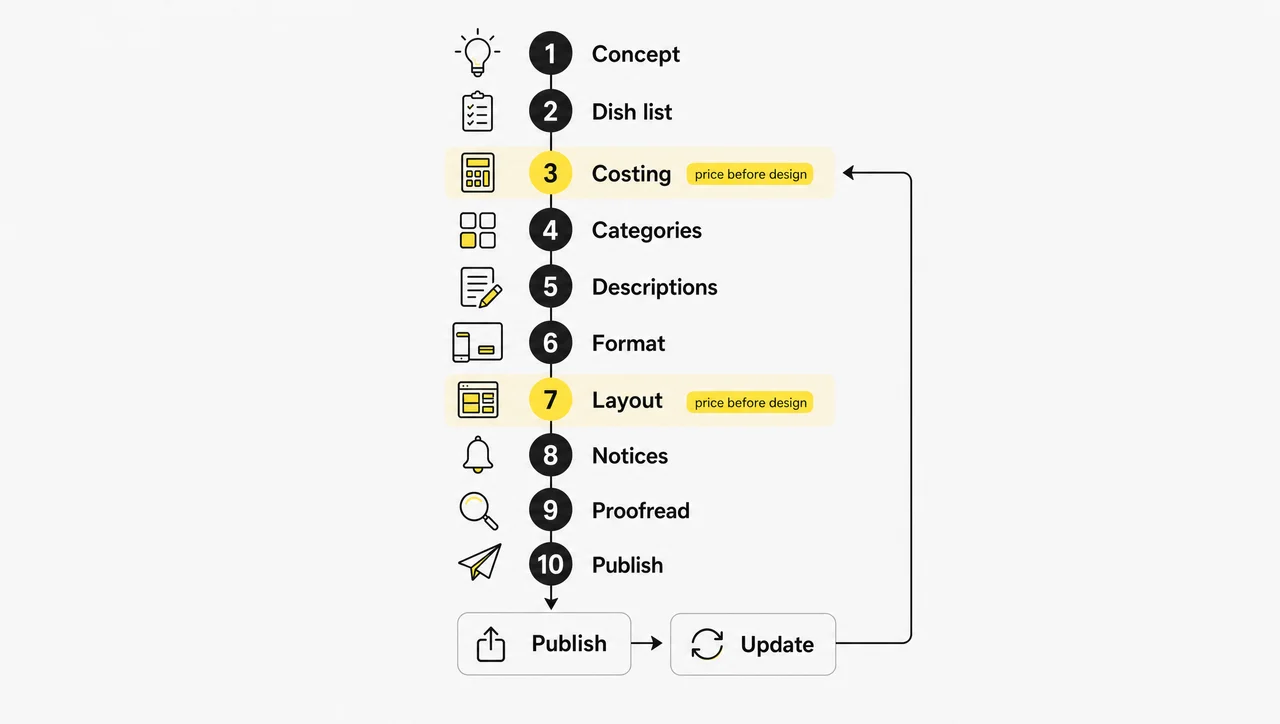
Knowing how to create a restaurant menu is mostly knowing the order. Prices come third and design comes seventh, because a beautiful layout cannot fix a dish that loses money or a list too long for your line to cook. The guide below walks through each step, answers how many items a menu should have, shows how to make your own menu for free, and covers what changes when the menu moves onto a screen. Next come the decisions that shape every menu before the first dish is written.
What to Decide Before You Create a Menu
Before you create a menu, settle five things that shape every page of it: who you cook for, the average check you are aiming at, what your kitchen can produce during the rush, how many items you can execute well, and where guests will read the menu. Every later choice, from dish names to paper size, follows from these answers, and the best menus make them explicit before anything else. Creating a menu without them, or learning how to create a menu from a template alone, usually ends in a long list that is hard to cook and hard to read.
| Decision | Why it matters | Example |
|---|---|---|
| Target guest | Sets dishes, portion sizes and tone of the copy | Office lunch crowd wants speed; a date-night bistro wants a story |
| Average check | Sets the price ladder for every category | A $15 lunch check leaves no room for a $38 entrée |
| Kitchen capacity | Decides which dishes survive a Friday rush | Two fryers and one grill cannot carry 12 fried items |
| Item count | Controls choice overload, prep time and waste | Six burgers beat fourteen |
| Where it is read | Decides format, font size and length | A table menu, a counter board, a food truck window and a phone screen all read differently |
Large chains treat menu creation as a months-long project, and their menus show it. First Watch, for example, develops each seasonal menu over about 18 months: the culinary team pitches roughly 50 ideas, leadership narrows them to 12, and those go through three months of recipe development and testing. An independent restaurant moves faster, but the logic is the same: ideas, a shortlist, testing, then purchasing.
How Many Items Should Be on a Restaurant Menu?
The best evidence comes from a 2013 Bournemouth University study of 443 diners. Guests at quick-service restaurants rated 6 items per category as the ideal amount of choice. In fine dining, the preferred numbers were 7 starters, 10 main courses and 7 desserts. Below those numbers the menu felt limiting; above them, choosing became a chore.
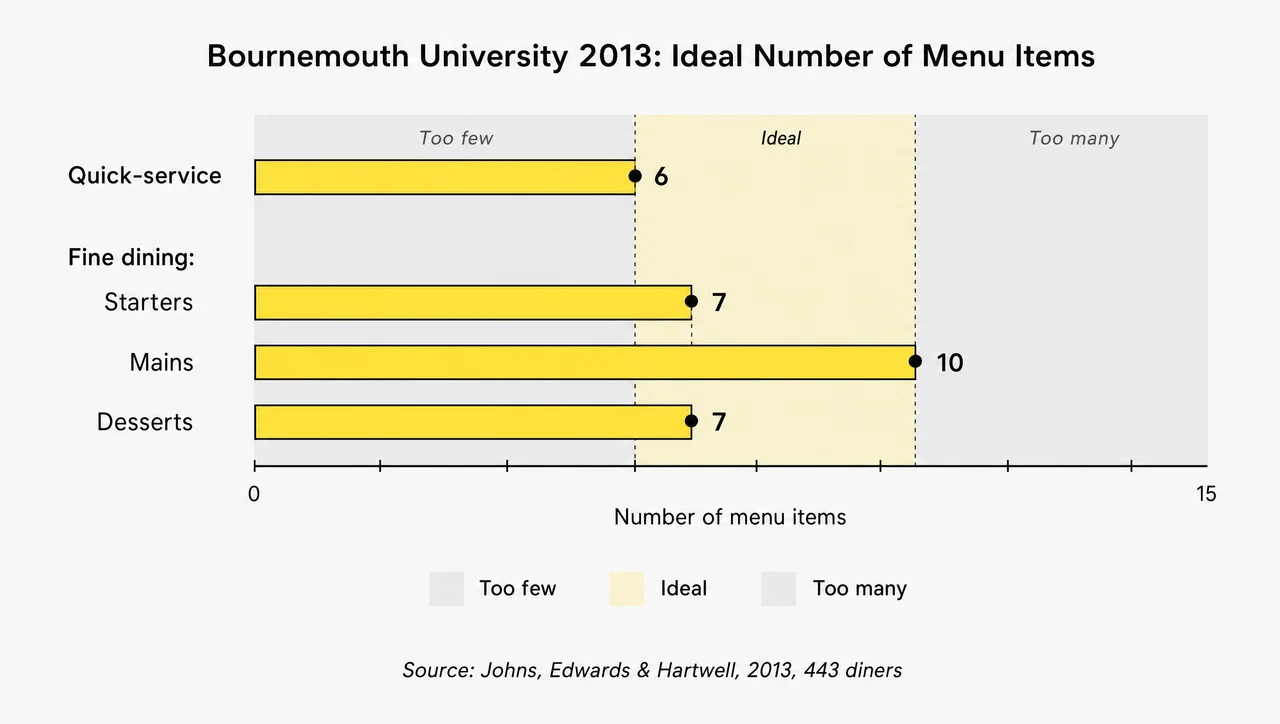
| Venue | Items per category | Items in total (common guideline) |
|---|---|---|
| Quick-service restaurant | about 6 | 20–30 |
| Fast casual and café | about 6 | 10–25 core items |
| Casual dining | 6–8 | 20–40 |
| Fine dining | 7 starters, 10 mains, 7 desserts | fewer than 20 per page |
| Food truck | a few per category | a short list, often under a dozen |
The research numbers are per category. Totals are industry guidelines, not rules. If one category grows past eight items, split it, for example burgers and chicken sandwiches, instead of making the list longer. Fewer items mean faster decisions, shorter ticket times and less spoiled stock. Next, the ten steps turn these decisions into working menus.
How to Make a Menu for a Restaurant in 10 Steps
How to make a restaurant menu comes down to ten steps that run in a fixed order: concept, dish list, costing, categories, descriptions, format, layout, required notices, proofreading and publishing. Skipping ahead to design is the most common reason owners end up redoing the whole menu, and it is the part most guides on how to build a menu gloss over. The same order works whether you create a menu for a restaurant, a café or a catering business.
Step 1. Define Your Concept, Guest and Price Point
Write one sentence that describes the restaurant, one that describes the guest, and a target average check. For example: “a neighborhood taco counter for office workers, $14 lunch check.” That sentence filters every dish you consider. Answer three questions before moving on:
- What will guests come back for twice a week?
- What can nearby restaurants not offer?
- Which price feels fair for this guest at this time of day?
Step 2. List Your Dishes and Check What Your Kitchen Can Handle
Start with a long list, then cut it by what your stations and staff can produce the same way every time. Check two things for each dish:
- Station load. Count how many dishes need the grill, the fryer and the oven. A station carrying half the menu becomes the bottleneck at peak.
- Shared ingredients. Cross-utilization means one ingredient works in several dishes across categories. An ingredient used in only one dish is the first candidate for waste.
| Ingredient | Dish 1 | Dish 2 | Dish 3 |
|---|---|---|---|
| Braised short rib | tacos | rice bowl | loaded fries |
| Pickled red onion | tacos | salad | burger |
| Saffron | paella | — | — |
In this example, saffron is the risk: an expensive ingredient carried by a single dish. Waste is not a side issue. According to ReFED, US restaurants and foodservice generated 12.5 million tons of surplus food in 2024, and 69.6% of it was plate waste, food served and left uneaten. Portions and list length are where a menu controls that number.
Step 3. Cost Every Dish, Then Set Prices
Set the price after you know the plate cost, never before. The formula fits on one line:
Menu price = plate cost ÷ target food cost %.
A dish with a $4.20 plate cost at a 30% target sells for $14.00. Most restaurants aim for a food cost between 28% and 35%. Plate cost includes every ingredient at its yield after trimming and cooking, plus garnish, sauce and packaging for takeout. Recheck costs whenever suppliers raise prices: US menu prices rose 3.4% year over year as of August 2026, according to the National Restaurant Association, and a menu priced on last year’s invoices quietly loses margin.
Price endings follow the concept too: quick-service menus often use .95 or .49 endings to signal value, while fine dining sticks to whole numbers, where a round price reads as quality.
Step 4. Group Dishes Into Menu Categories
Menu categories are the sections that group items on a menu, usually in the order of a meal: starters, soups and salads, mains, sides, desserts and drinks. Most menus work well with 5 to 7 categories. Add specials, kids or combos only when the concept needs them.
- Full-service restaurant: starters, salads, mains, sides, desserts, drinks.
- Café: coffee, tea, cold drinks, pastries, breakfast, sandwiches.
- Quick service: combos first, then burgers or bowls, sides, drinks, desserts.
- Bar: cocktails, beer, wine, spirits, snacks, shareables.
Menu categories are different from the types of menus. The main types are à la carte (every dish priced separately), table d’hôte (a set price with a short choice per course), prix fixe (one price for a fixed sequence), du jour (a daily menu) and cycle menus (a rotation used by cafeterias and schools). Pick the type first, then build categories inside it.
Step 5. Name Your Dishes and Write Short Descriptions
A good description names the main ingredient, the cooking method and one sensory detail in 10 to 20 words. “Pan-seared salmon, lemon-dill butter, crispy fingerling potatoes” tells a guest more than “delicious salmon plate.” For a menu board, cut the same copy to one short line.
Creative names need support. A 2017 study in the International Journal of Hospitality Management found that food photos raised purchase intentions when the dish name was descriptive, like “chocolate cake.” With vague names like “Midnight Madness,” photos helped some guests and lowered ratings for others. A playful name plus one plain line of description serves both kinds of guest.
Step 6. Choose Your Menu Format
Pick the format by service style and by how often prices change; most menus live in more than one format at once. Common print sizes cover most restaurants: 8.5 × 11 inches for casual and full-service dining, 8.5 × 14 inches for longer menus, 11 × 17 inches folded for takeout, 4.25 × 11 inches for drink and wine lists, and 5.5 × 8.5 inches for cafés.
| Format | Best for | How often it changes | Cost of each update |
|---|---|---|---|
| Single printed page | cafés, lunch spots | a few times a year | reprint |
| Folded or booklet menu | full-service, larger menus | seasonally | reprint and redesign |
| Wall or counter board | counter service, food trucks | monthly | new panels or chalk |
| QR or online menu | takeout, reorders | anytime | near zero |
| Menu screen | QSR, cafés, chains | daily if needed | near zero |
A QR code does not replace the printed menu. In a 2024 survey of 850 US adults, 81% preferred a physical menu and only 1% named a QR code as their preferred format. Among guests 55 and older, 90% preferred paper. QR works as an extra, not a substitute.
Step 7. Lay Out the Menu So Guests Notice Your Best Items
Guests read menus the way they read a page: top left first, then down, section by section. Layout rules follow from that:
- Put your best sellers with high margins first or last in each section. People remember the first and last items of a list best.
- Drop the dollar sign. In a Cornell and Culinary Institute of America study, guests who saw prices without “$” spent about 8% more than those who saw prices with it.
- Do not line prices up in a column. A price column invites guests to shop by price instead of by dish.
- Highlight one or two items per page, using a box, an icon or extra white space. Highlighting everything highlights nothing.
- Use two or three fonts at most, and keep text contrast at 4.5:1 or higher against the background, the accessibility standard for normal text.
- Use photos sparingly, at most one per category, and only good ones.
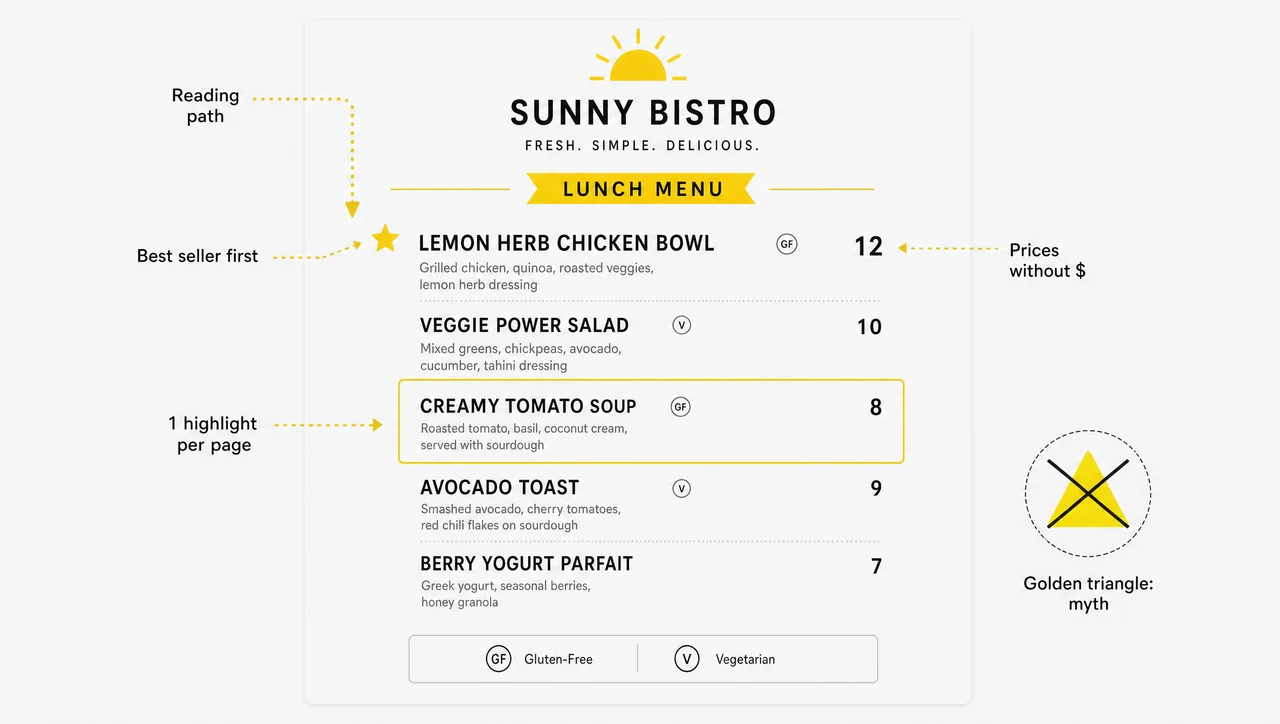
The “golden triangle” is a myth. Many design guides claim eyes jump to the center, then the top right, then the top left. When San Francisco State researcher Sybil Yang tracked the eyes of diners in 2012, she found they read menus like a book, and a single “sweet spot” did not exist. Design for top-to-bottom reading.
Step 8. Add Allergens, Abbreviations and Required Notices
This step protects guests and keeps menus compliant. Check four items:
- Major allergens. The FDA lists nine major food allergens: milk, eggs, fish, crustacean shellfish, tree nuts, peanuts, wheat, soybeans and sesame. Sesame became the ninth on January 1, 2023, under the FASTER Act.
- Allergen notice. Federal allergen labeling law covers packaged food, so restaurants are not federally required to list allergens on menus. The 2022 FDA Food Code, which states adopt in their own versions, asks restaurants to notify guests in writing, for example on menus, table tents or placards. Some states go further: Massachusetts requires every menu and menu board to carry the line “Before placing your order, please inform your server if a person in your party has a food allergy.”
- Consumer advisory. Dishes with raw or undercooked meat, eggs, fish or shellfish need a disclosure, such as an asterisk or “(raw)” next to the dish, and a reminder that consuming raw or undercooked foods may increase the risk of foodborne illness. This rule sits in section 3-603.11 of the FDA Food Code and applies to QR and delivery menus too.
- Calories. Chains with 20 or more locations under the same name must show calories for standard items on menus and menu boards, add a statement that 2,000 calories a day is used for general nutrition advice, and offer full nutrition information on request.
Add a legend at the bottom for icons and abbreviations such as GF, V and MP (market price), so no guest has to ask what a symbol means.
Step 9. Proofread and Test the Menu
Before anything goes to print, run a short test:
- every price matches the POS
- every dish name is spelled the same on the menu, the POS and the website
- allergen icons and the consumer advisory are in place
- three people unfamiliar with the menu can order in under a minute
- text on a wall board reads from the back of the line; allow about 1 inch of letter height per 10 feet of distance
- the QR version opens and reads well on a phone
- one test print shows true colors and margins
Step 10. Print It, Post It or Put It on a Screen, and Plan Updates
Publishing means choosing channels for your menus: the printed menu at the table, a board at the counter, an online menu for takeout, and the menu on delivery apps. Decide at the same time who changes a price, how fast, and in how many places. On paper, every change means a reprint. On a screen, the change can come straight from your POS: Decker connects the menu to POS systems such as Toast, Square and Clover, so a new price shows on screen in 1–5 seconds and items marked out of stock disappear on their own. For counter-service venues, digital menu boards for restaurants turn this step from a weekly chore into part of normal work. However, you do not need paid software to build your first menu.
How to Make Your Own Restaurant Menu for Free
You can make your own restaurant menu for free with three tools that cost nothing: a ready-made template, a word processor or free online design tool, and a home printer or local print shop. The free route works for a single location with stable menus. It gets expensive in staff time once prices change often.
| Route | Good for | Limits |
|---|---|---|
| Word processor template | text-heavy menus, fast edits | basic design, manual price changes |
| Free online design tool | branded print or PDF menus | account needed, some assets paid |
| Free menu template library | quick, finished look | every change is a manual edit |
| Free digital signage plan | one menu screen | one screen on free plans |
The fastest way to create a restaurant menu for free is to start from ready-made menu templates: pick a layout, swap in your categories, prices and logo, then export. For a full dine-in menu, start with restaurant menu templates already split into starters, mains and desserts, and adjust the categories to your list. Print at home for a first test run, then order a small batch from a local print shop. Home printers usually cannot print to the edge, so keep a 0.25-inch margin.
A free template does not make a free menu. The template costs nothing, but every price change means editing the file, exporting it and reprinting every copy. At four price updates a year, that is four print runs per location.
See your menu on a screen before you print the next batch. Decker keeps one screen free forever and gives a 30-day trial of every paid feature on up to 5 screens, no credit card. Book a demo
Moving Your Menu Onto a Screen
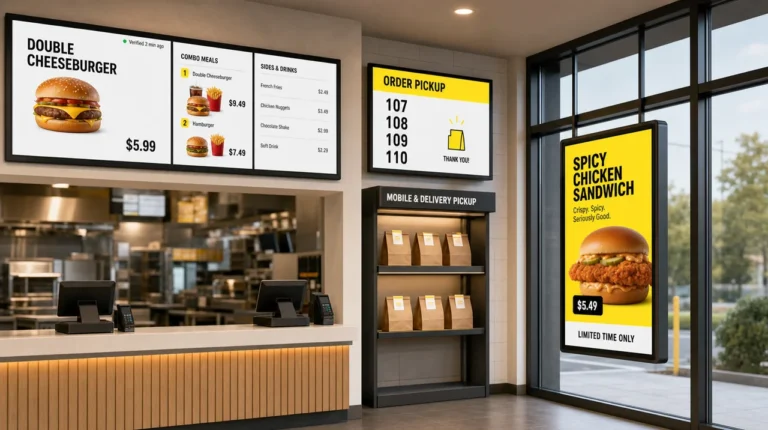
A menu screen is a TV or commercial display that shows the same menu, but the content has to be rebuilt for it: fewer words, larger type and prices that can change without a reprint. Printed menus squeezed onto a TV are hard to read from the line.
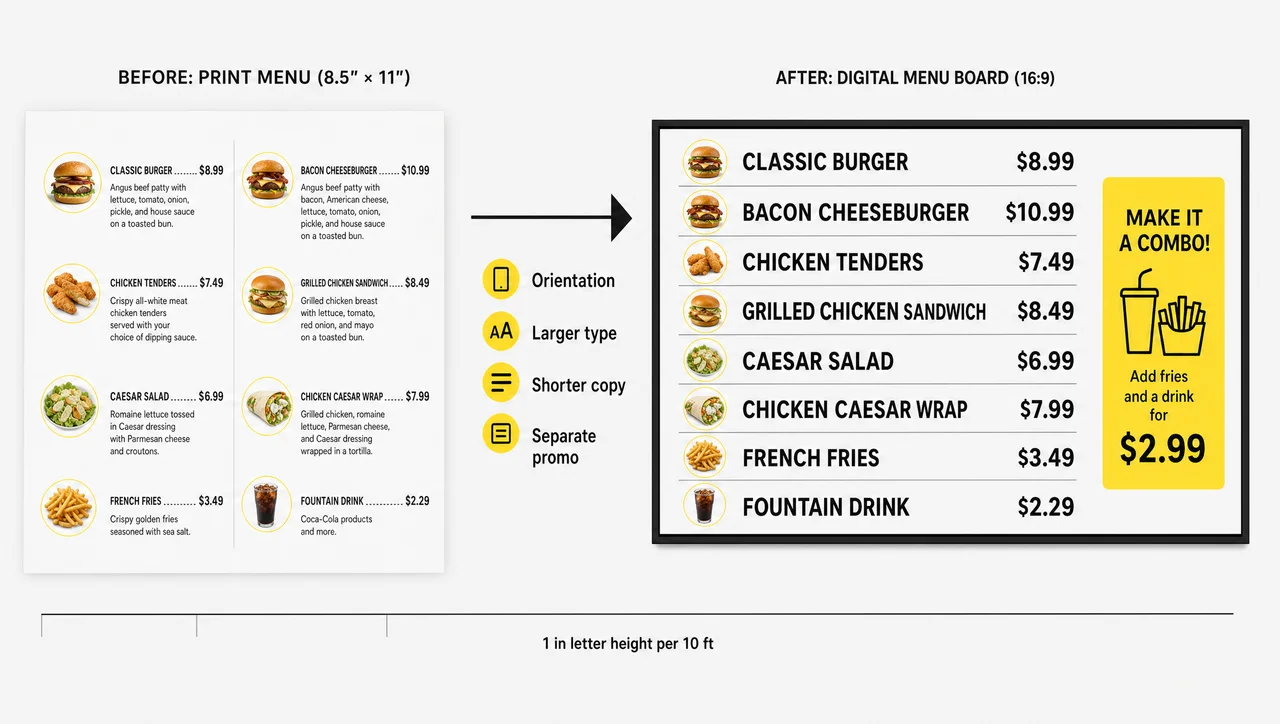
Adapt the menu in four moves:
- Pick the orientation. Landscape 16:9 fits wide counters; portrait 9:16 fits narrow walls and single-column lists.
- Enlarge the type. Plan about 1 inch of letter height for every 10 feet between the guest and the screen.
- Cut the copy. One line per item, prices in the largest numbers on the screen, descriptions only for featured dishes.
- Separate menu and promo. Keep prices static on the main screens and rotate promotions on one screen or in one zone.
Chains with 20 or more locations must show calories on menu boards too, so the calorie line needs a place in the layout from the start. Switching from printed boards to digital menu boards pays off when prices, dayparts and limited-time offers change often enough that reprints become routine.
When a Printed Menu Is Still the Better Choice
- Your menu changes fewer than twice a year. A printed or magnetic board costs less over three years than any screen and software plan.
- You serve at the table. With 81% of guests preferring a physical menu, a printed menu belongs in their hands, and a screen works best at the counter or entrance.
- You run one location with a small, fixed list. A chalkboard or a single printed sheet is easier to keep current than a screen.
- No one on staff will update it. A screen showing last month’s prices does more harm than a printed menu.
Overall, screens earn their place where prices, dayparts and promos change often, and printed menus win where they rarely do.
How to Make a Food Menu for Your Type of Venue
How to make a food menu depends on the venue that serves it: a dining room needs a menu for the table, a café needs a drink-first board, a food truck needs a list readable from the street, and a caterer needs menus of packages priced per guest. The ten steps stay the same whether you learn how to create a food menu for a dining room or how to do a menu board for a truck; only the emphasis moves.
Full-Service Restaurants
Aim for 7 to 10 choices per course, following the Bournemouth study. Put the story of the kitchen into descriptions, keep the allergen notice visible, and give wine and cocktails a separate list, often in a slim 4.25 × 11 format.
Cafés and Coffee Shops
Drinks lead the menu. List sizes once in a header row instead of beside every drink, and group add-ons, such as milk alternatives and extra shots, into a single modifiers line. Keep the food list short and seasonal.
Food Trucks
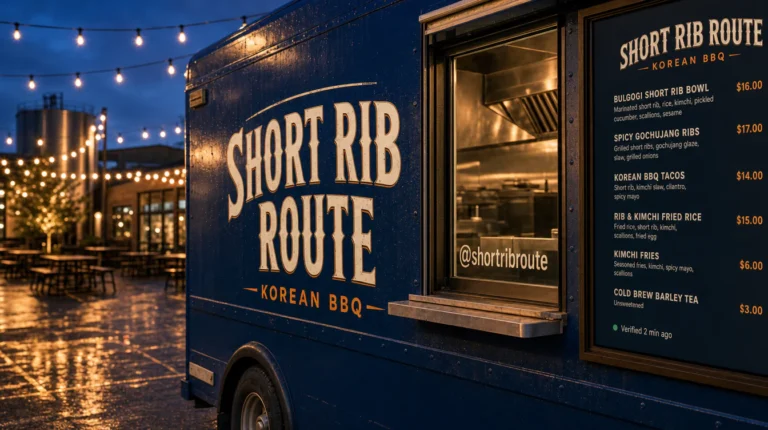
A truck menu competes with the street, so keep it short and readable from several feet away. Most trucks list a handful of core items plus one or two specials. Use large type, put prices in the biggest numbers on the board, and leave space for a sold-out marker.
Bars
Split the drinks list into cocktails, beer, wine and snacks. Show pour size and price for wine by the glass and by the bottle in two columns, and list happy hour prices with the hours they apply.
Catering
Catering sells packages, not plates. Price per guest, show minimum orders, and list what each package includes. Overproduction in catering made up 9% of foodservice surplus food in ReFED’s 2024 data, so plan portions per head carefully. For themes and package structures, browse these catering menu ideas. However, even well-planned menus fail on a handful of common mistakes.
How to Make a Successful Restaurant Menu: 7 Mistakes to Avoid
A successful restaurant menu avoids seven mistakes that cost sales: too many items, prices set before costing, dollar signs and price columns, small low-contrast text, missing allergen notices, stale prices, and a menu nobody can update quickly.
- Too many items. Guests prefer about 6 to 10 choices per category; beyond that, decisions slow down and waste goes up.
- Prices set by guesswork. Without plate costs, a best seller can lose money on every sale.
- Dollar signs and price columns. Both push guests to compare numbers instead of dishes.
- Small type and low contrast. Guests who struggle to read a menu order the first familiar thing they see, or leave.
- No allergen notice or legend. Missing information turns into questions at the counter and risk in the kitchen.
- Stale prices on the board. A price that no longer matches the register creates disputes at checkout.
- A menu that cannot change fast. When a 3.4% annual rise in menu prices meets a reprint cycle, margins erode between print runs.
More choice does not mean more sales. A longer menu feels generous but slows ordering and raises waste. The Bournemouth study found that guest satisfaction drops once a category runs past its ideal size.
As a result, how often you revise menus matters as much as how well you write the first draft.
How Often Should You Update Your Menu?
Update the prices on your menu whenever plate costs move, which usually means at least quarterly, refresh the seasonal dishes two to four times a year, and review the full menu every one to two years. Daily specials and sold-out items change in real time.
| What changes | How often | Trigger |
|---|---|---|
| Prices | as costs move, at least quarterly | supplier invoices, food cost above target |
| Seasonal dishes | 2–4 times a year | ingredient availability |
| Full menu review | every 1–2 years | sales mix, new concept, redesign |
| Specials and sold-out items | daily | kitchen stock |
Review the sales mix before each update. A profit-and-popularity analysis developed at Michigan State University in the early 1980s sorts dishes into four groups: stars to keep and feature, plowhorses to reprice, puzzles to reposition, and dogs to cut.
The update rhythm is where printed and digital menus differ most. In Decker, the menu is tied to POS data, so a price change in the POS appears on every screen without a designer, breakfast switches to lunch on schedule, and sold-out dishes drop off the board. In the Burger Shop case in Downtown Los Angeles, four menu screens were connected to the POS, and menu updates went from days or weeks to minutes. In other words, the easiest menus to keep current are the ones tied to data you already maintain.
Questions and Answers
1 How do you make a menu step by step?
Making a menu takes ten steps that follow one order: define the concept and guest, list dishes your kitchen can repeat, cost each dish and set prices, group items into 5–7 categories, write short descriptions, pick a format, lay out the page with best sellers first or last in each section, add allergen and legal notices, proofread, then publish with an update plan.
2 How long does a new restaurant menu take?
A menu built from a template with dishes you already cook takes one to two days. A new concept with recipe testing, costing and design usually takes several weeks. Large chains plan in months: First Watch develops each seasonal menu over about 18 months, including three months of testing.
3 What should be included on a restaurant menu?
Include the restaurant name, categories, dishes, short descriptions, prices, a legend for icons and abbreviations, an allergen notice, and a consumer advisory for raw or undercooked items. Chains with 20 or more locations also need calories and the 2,000-calorie statement. Takeout menus add hours, address and ordering details.
4 Can AI write my menu?
Yes, as a first draft. AI can suggest categories, dish names and descriptions in minutes, and some menu tools, Decker’s Professional plan included, generate a full design. Check every price against your plate costs and every allergen against your recipes yourself: AI does not know what is in your kitchen.
5 Should a menu be one page or several?
Keep the core menu on one page or one spread if you can; short menus win here too. Guests scan it faster, and it forces you to cut weak dishes. Move drinks, desserts and kids’ items to separate menus when the main page gets crowded.